Replacing your T5 Fluorescents
Date Published - 23rd July 2012 - Published by - iQuatics Ltd
Replacing T5 Fluorescents
Unplug all power cables that control your light unit from the mains and let the unit cool down completely (Ideal to change the bulbs at the time of day which your lighting is not in use, saving you having to disturb the timing of your aquarium lighting.

Remove your aquarium lighting unit away from above your aquarium and place somewhere which will not hinder the process of replacing your bulbs. You do not want to run the risk of accidentally shattering your fluorescent tube above your tank. Fluorescent tubes can be very fragile. Be careful when removing the bulb from the packaging.
Once you have got to the stage of removing the old fluorescent by following the instructions supplied with your fixture, please follow the following few steps:
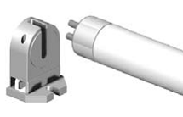
Place one end of the lamp into the one end of the lamp holder connections (universal for all branded halides).
Then push the lamp contacts into the fittings together. Once they are in place turn the tubes 90° until they lock into place.
Make sure there is a secure connection between the lamp and the fitting. If necessary please apply a slight pressure to press the socket against the fitting.
To remove the fluorescent tubes please repeat the process in reverse order.
WARNING: Make sure the protective plastic cover is securely in place before you plug your unit in and attempt to turn the light fitting on.